You have no items in your shopping basket.
RSS

Blog Posts & Useful Tips by ADIGE Towel Radiators

Welcome to ADIGE Towel Radiators Blog which is updated by our experienced team on a regular basis. As well as offering you a wide range of products, we also wish to communicate in real time with our web site visitors and customers.


Here you will find useful information on towel radiators and heated towel rails, ask questions about our products & services and get prompt answers to your queries.


With over 20 years of experience in our field, this blog is our perfect solution to share this hard earned and gained experience in the world of heated towel rails. We have plenty of How to Guides, tips and general advice on home improvements, bathroom renovations, heat requirements and designer towel radiators.


You may find these great posts and articles by following the links under popular blog tags or by following the links under blog archive. For your convenience below are the direct links to those 10 most recent posts.


Basement Conversions and Creations - Good or Bad?

When space is at a premium, and you have exhausted all other avenues of expansion, a basement conversion could be the way forward. Certainly in overcrowded central London, expensive basement conversions have become the norm with super-rich Oligarchs and well-known celebrities vying on who can build the most ostentatious basement conversion. But is a basement conversion a good idea for the average person? Or would you be better renovating the attic or building a regular extension instead?

If you already have an existing basement, converting it into a habitable space won’t be too difficult. Your basement should already be waterproofed and ventilated, so aside from the addition of extra lighting and other mod cons, it will not cost you too much money to turn it into a spare bedroom, playroom, or whatever else you need.

Creating a whole basement from scratch is a different story and definitely not one for the faint hearted. Digging out a basement is a major project. It is not something a keen DIY enthusiast can do on their weekends as foundations need to be checked to ensure they can support the structural alterations. There is also water drainage to consider – imagine the carnage if you accidentally severed a water main. Lastly, there is a cost implication – digging out a whole new basement from scratch is not cheap, so be prepared to spend a lot of money to achieve your perfect underground living space. 

Is Planning Permission Needed?

You shouldn’t need planning permission if you are converting an existing basement. Your new basement living space can even be larger than the old basement as long as you don’t extend beyond the boundary of your property. However, in some cases, specific planning permission will be required. For example, if you live in a terrace house, you will need a Party Wall Agreement in place since you share a common wall with your neighbours. To avoid any problems, always check with the local planning office before you start excavating – or it could get a bit messy further down the line.

Important Considerations for Basement Development

  • Damp proofing – A damp basement might be ok for storing old tins of paint and a few bottles of wine, but it certainly won’t be very pleasant for guests, so an adequate damp proofing strategy is essential. There are different methods of keeping the water out; your building contractor will be able to advise you on the most appropriate one for your basement. A water membrane system can be used to seal the space and allow water to drain away. Alternatively a cement based system may be more suitable.
  • Heating - Basements are usually cool all year round which can be comfortable in summer but a bit chilly in winter months. Basements are often partially insulated by the ground around them, so your existing heating system should provide the reasonable amount of heat required for comfortable temperatures. You will however need to check with a heating engineer to see if your existing central heating system can handle a new designer vertical radiator. Alternatively, you can opt in for an electric designer heated towel rail independent from your central heating system.
  • Lighting – Natural light is key to a successful basement renovation. Often natural light is in short supply when you build down instead of up, but there are ways and means to introduce natural light into a basement, even if you don’t have any windows. Light tubes can be used to pipe light down into a basement. Alternatively, you may be able to fit a flat double glazed window at ground level, which will have the added benefit of giving you an extra source of ventilation.

Plan the Space Carefully

How you use the extra space will probably depend on how much light there is down below. If natural light is in short supply, consider turning your new basement into a games room or gym, but if you are able to introduce natural light, it could make a great guest bedroom or teenager’s bolt hole.

Choose an Experienced Contractor

Basement renovations can be challenging, so always choose a reputable contractor who has previous experience with basement conversions. It can be tempting to try and save money in the short term, but when things go wrong, it is usually extremely expensive to try and fix them.

Can the Green Deal Save You Cash?

An energy efficient home is far more than an eco-home with a compost toilet and a turf roof. By maximising your energy efficiency you can potentially save hundreds of pounds per year. You can also have a much nicer home; a home that is warm in the winter. So what is the Green Deal and how can it help to make your home more energy efficient?

The Green Deal is a scheme devised by the government to help households pay for home improvements that can reduce energy bills. The idea is that instead of taking out a loan to pay for big home improvements such as installing double-glazing or a new energy efficient boiler, you pay for the improvements via savings made on your electricity bill. And if this sounds way too good to be true don’t worry because it really is a very good scheme; or at least it is for most households.

Green Deal Stamp

A Green Deal for Everyone

Unlike some government sponsored schemes, the Green Deal is open to everyone. You don’t have to be on a low income to qualify for Green Deal grants. Anyone can apply for Green Deal money, although those on a low income will be eligible for extra assistance. The Green Deal is even available to tenants, the only caveat being that a tenant must get their landlord’s permission as the repayments are tied to the property rather than the tenant. You can also apply for Green Deal money if you have an electricity meter.

How the Green Deal Works

Borrowing money to pay for energy efficiency improvements via the Green Deal initiative is fairly straightforward. Unlike a regular loan, Green Deal repayments shouldn’t cost you any more per month than what you are currently paying out on bills. Because the Green Deal scheme is supposed to save you money on your energy bills, once the energy improvements have been made, your energy bills will be lower and therefore there will be no net increase in annual expenditure.

Repayments are the amount you are predicted to save on your bills, plus interest. The repayments are spread over a long period of time – between 10 and 25 years. The money is deducted directly from the electricity account, so if you move home, the debt stays with the property.

To apply for Greed Deal funding, you need to invite a Green Deal assessor to come and check out your home. This part of the process isn’t free, so make sure you shop around for one of the cheaper organisations. You should also check that whomever you invite is a member of the Greed Deal scheme. There may also be free assessment deals available in your area – so check before you pay for an assessment.

Eligible Home Improvements

There are lots of home improvements you can make with Green Deal funding:

  • Double-glazing
  • Loft insulation
  • Replacement boiler
  • Solar panels
  • Cavity wall insulation
  • Solid wall insulation

One important thing to note is the some of the more expensive home improvements will require a portion of the payment upfront. The reason for this being that the energy savings you are predicted to make will not cover the cost of the installation entirely. So do make sure you can afford to inject some cash into the deal before you apply for funding.

Once you have had your energy assessment done, you can shop around for the cheapest quote for the work. You are not obliged to have the work carried out by the company that did the Green Deal assessment, even if they imply you are. So don’t be ripped off – get at least three quotes before you sign on the dotted line.

Here are some useful links for more information on Green Deal;

green deal footer banner

When NOT to Try DIY

Home improvement programmes have become massively popular in recent years. Turn on the TV on any given day and you will be confronted with bright and breezy presenters telling you how to transform your home from an uninspiring box into a palace fit for an A list celebrity. And the best bit? Instead of paying a fortune to a builder or interior designer, if you follow the tips on screen, you can achieve some amazing results with a spot of DIY.

But is it really such a great idea to have a go at complex home improvement projects? Surely it would be better to pay someone else to do the work, even if it’s more expensive. Well, it depends. DIY is obviously going to be cheaper if you have the skills and tools available. It can also be more satisfying to do the job yourself and let you select a stunning designer towel radiator instead of a standard heated towel rail using your savings. However, there are times when you shouldn’t attempt DIY, so if you have a burning desire to have a go at home improvement, give it some serious thought before you pick up any power tools.

The Sharp End

When you don’t know one end of a tool from another, DIY is not a good idea. Power tools are lethal weapons in inexperienced hands. One false move and you could end up in casualty, so start small and work your way up to more complicated jobs.

A Complicated Project

Some DIY tasks are relatively simple. Most people can change a tap washer or put up a shelf without any major problems. You don’t need specialist skills or lots of tools to do simple jobs - some general knowledge will suffice. And even if you do get it wrong, the consequences won’t be too serious.

However, many DIY jobs are not simple and it is these that the amateur DIYer should stay well away from. Some tasks need specialist skills that only a qualified tradesman will have. For example, installing a new central heating boiler should not be attempted unless you are suitably qualified. Whilst a competent DIYer is more than capable of fitting a new radiator or replacing a shower, installing a boiler is a whole different ballgame, so don’t be tempted to ‘have a go’.

A Poor Track Record

If you have spent time in casualty as a result of severing something vital with a power tool, don’t even think about attempting any DIY task, no matter now simple it appears to be. There are some people who just can’t be trusted with a sharp tool, either because they are clumsy or just unskilled. If this sounds like you, pay someone else to do the work instead. Yes, it will be more expensive, but unless your spouse has a huge life insurance policy with your name on it, it is the safer option.

Building Regulations

There are many home improvements where the finished result has to adhere to building regulations. For an experienced builder or tradesman, this won’t be a problem, but if you are an amateur, you probably won’t have a clue about such things. To avoid falling foul of the local housing department, don’t be tempted to cut corners and save money by doing it ‘on the cheap’. Your house might not fall down, but a bad job will definitely cause issues when you want to sell at a later date.

DIY can be enormous fun. It can also be very rewarding as the sense of pride that comes with surveying a completed project is hard to beat. However, DIY is an expensive folly if you attempt a project well beyond your skill set, so never overestimate what you are capable of or you could end up with an expensive repair bill.

Garage Conversions: Good Idea or Terrible Mistake?

The garage is often the most underused space in our homes. Originally garages were intended for storing cars, but over the years garages attached to modern homes have shrunk to such an extent that a large percentage are too small for even compact cars. As a result, garages tend to become the dumping ground for a vast range of miscellaneous items: bicycles, gym equipment, gardening equipment, DIY junk, and anything else that doesn’t have a home, including spiders.

But there is another way. Garages can be converted into useful living spaces that enhance the rest of the property instead of becoming a graveyard for unwanted board games and half used tins of paint. Imagine how much more useful your garage would be if it was transformed into a study, kids’ play room, or even teenager’s annexe. So what do you need to consider before starting a garage conversion?

Change of Use Application

Simple garage conversions will only need a wall and window/door in place of the existing garage door. However, since a garage is not designed as a living space, in order to turn it into one, you will need to apply for Buildings Regulations approval since you are changing its use. You may also need to build extra foundations or add lintels to support the new structures.

Is Planning Permission Necessary?

Unless the existing structure is altered, planning permission won’t be necessary. However, if your home is a listed building or the garage is a stand-alone structure, planning permission may be needed from your local planning department, even if you are only making a few very minor alterations. As such, it is always sensible to check with the local planning officer before doing anything – and make sure you ask for written confirmation.

Building Regulations require that a room created from a garage must have adequate ventilation and an escape route in the event of a fire. Infill walls will also be subject to Building Regulations to ensure adequate foundations are in place. Once the conversion has been completed, the building inspector will come and inspect the work before he issues a certificate of completion. For this reason, it is a good idea to employ a reputable contractor rather than attempt to do the work yourself (unless you are suitably qualified of course). Without a certificate of completion, you will run into serious problems if you try and sell the property at a later date, as your buyer’s solicitor is likely to start asking difficult questions about the change of use of the garage. 

Create a Lovely Living Space

Before starting a garage conversion, think about what you want to do with the space. Where will access from the main house be? What about lighting, damp proofing and ventilation? At the very least the new space will require a window large enough to escape through. The new space will also need extra insulation, and if you want to sub-divide the space into two rooms, you will need to construct a new block or stud wall. Additional wiring and plumbing will also be required – can your central heating boiler cope with the extra load of a new vertical radiator (or two)?

Loss of Use

One important thing to consider when planning a garage conversion is that the creation of a new living space will entail the loss of a large storage space. Do you have somewhere else to keep your bicycles, DIY equipment and a whole host of other junk?

You should bear all of these things in mind before making a final decision. Although a garage conversion is always going to be cheaper than moving to a bigger property, don’t forget to factor in all of the less obvious costs such as a new central heating boiler, new flooring, plus a new shed for all of your items.

How to Design the Perfect Teenager’s Bathroom

There comes a point in every parent’s life when you dream of having a bathroom all to yourself. Instead of queuing up outside the bathroom every morning, feeling as if you are a tenant in your own home, you can relax and enjoy a pleasant soak in the bath or a leisurely shower. With teenagers in the house, such a happy scenario is out of the question. They take forever in the bathroom, doing what teenagers do best, which is personal grooming on an epic scale.

The best way to avoid losing access to the bathroom every morning (and evening) is to provide them with their very own bathroom. That way you can enjoy having a bathroom all to yourself and they can spend as much time as they like primping and preening in front of the bathroom mirror. So, what things should you include in a teenager’s bathroom?

Power Shower

Ideally install a shower in a teenager’s bathroom. They will want to have a bath or shower at least once per day, so it makes sense to provide a shower as it will save you money on your water bill if you are on a water meter. You may even wish to consider the possibility of a wet room.

Storage Space

Ample storage space is a must-have in any teenager’s bathroom. Most teenagers have vast collections of makeup, lotions and potions, all of which take up a lot of space. One bottle of shampoo and conditioner won’t be enough. They are more likely to have about fifty, plus matching bottles of conditioner, hair serum, and anything else they think will make them look cool.

Since the majority of their time will be spent staring into the bathroom mirror, it makes sense to have a fitted vanity unit rather than a standard sink. This will give them lots of room to store their bottles, spot creams and beauty accessories. A storage unit in the shower cubicle or above the bath is also a good idea as this will keep some of the clutter out of the shower tray and bath.

Mirror, Mirror

As we have already mentioned, teenagers do like to spend an inordinate amount of time gazing into the bathroom mirror. A large mirror with an inbuilt lighting – think movie star - vanity mirror would be the ideal bathroom accessory for an image conscious teenager. Providing adequate lighting should help to ensure they don’t overdo the fake tan or makeup.

A Laundry Basket

Most teenagers treat the floor as one big laundry basket. They assume that the laundry fairy is hovering nearby, ready to collect their dirty laundry and return it in a convenient pile, washed and ironed. One way to encourage your teenager to be a bit tidier is to provide them with a laundry basket. Do make sure it is large enough, though, as most of them use a clean towel virtually every day and bath towels soon fill a laundry basket up.

Funky Décor

It is a good idea to consult your teenager before deciding upon a decorative scheme. Just because you like pastel colours or plain white tiles, they might not be of the same mind. Take their tastes into consideration, but don’t allow them to talk you into something too outrageous. Just because they have seen an amazing bathroom on At Home with the Kardashians, it doesn’t mean that floor to ceiling marble is a great idea in their small bathroom. 

However you choose to design your teenager’s bathroom, make sure you provide them with lots of cleaning equipment and full instructions on how to clean a bath, shower and toilet. It will be a valuable lesson for them.

Loft Conversions - A Cheap and Cheerful Way to Add Extra Space?

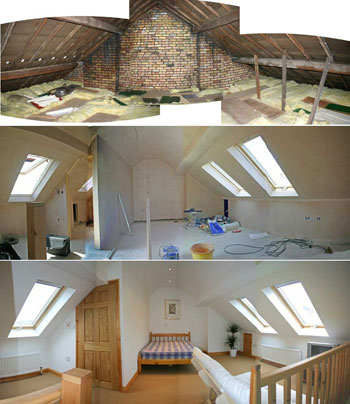
When space is in short supply and you can’t afford to move to a larger property, the next natural step is to think about extending upwards. Since all homes have some degree of loft space, turning what is ‘dead space’ into usable living space can make perfect sense if your home is just too small now that you have kids/teenagers/elderly parents living with you. But loft conversions are not as straightforward as some people think, and there are a number of important issues to take into consideration before you install a dormer window and a new staircase.

Is the Loft Suitable for Conversion?

Sadly, not all attics are suitable for converting into living space. Older properties, typically those built pre: 1960, are usually suitable, but modern homes tend to have different roof constructions that are more difficult to convert. Truss sectional roof structures are the norm in modern houses. To convert a roof of this type is an expensive job because it entails adding structural support in the form of steel beams. Older properties have traditional framed roof structures, which can be opened up fairly cheaply. The best way to check whether (or not) your loft is ripe for conversion is to open up the loft hatch and take a look.

How Big is the Loft?

Head height is very important in a loft room. There is little point in building a room in the loft if you can’t actually stand up in there. Depending on how tall you are, there needs to be at least 2.2m of head room in the main part of the roof space, so a loft with a low roof pitch is not going to be suitable unless it is redesigned or large dormer windows are added to increase the amount of available floor space.

Water tanks and chimney stacks can also prove to be major obstacles in the roof space. You might be able to move a water tank, but it is pretty difficult to relocate a chimney stack.


Loft ConversionsCredit to Artdom Construction Ltd

Building Regulations

Loft conversions must meet current Building Regulations, so it is a good idea to have your plans for a loft conversion drawn up by an architect before you start looking for a building contractor. This should help to iron out any potential problems before building work begins. If your property has any party walls, you must tell your neighbour about the work. If you intend on adding dormer windows to the roof to create extra light and head room, you may need to apply for planning permission – check with the local planning department for clarification.

Fire Safety Issues

Fire safety is very important in a property with more than two storeys. It is a lot harder to escape a fire when you are on the third floor of a house, so the new floor must have adequate fire protection in the form of a fire door and windows large enough to escape from.

Other Considerations

Obviously you will need a staircase into the attic if it is turned into additional living space, but do you have room for a staircase? There is no point adding a new room if you have to sacrifice a room in the process. A bespoke staircase design might save you space, but it will cost more. Spiral staircases can also save space, but they are a nightmare when it comes to shifting furniture.

Can your central heating boiler cope with the addition of extra radiators or maybe even a new stainless steel heated towel rail? If it can’t, you may need to upgrade to a new boiler, which will be further expense.

A loft conversion will add value to your home and make it easier to sell, but only if the conversion is a quality one. So weigh up the costs and don’t be tempted to hire a cheap builder or you could end up paying dearly in the long run.

Top 6 Kitchen Design Disasters

Kitchen design can be tricky. Not only do you have to deal with issues surrounding plumbing, electrics and how on earth you are going to fit all those cabinets in that teeny tiny space and still have room to cook, but you also need to think about the overall design of the room. Most people opt to have a kitchen designed by a professional. It’s the easiest way of ensuring everything fits as it is supposed to. But even if you do go down this route, you are still responsible for choosing the fixtures and fittings, so if you are in the market for a new kitchen, here are a few tips to help you avoid any design disasters.

Don’t Be Boring

Being boring isn’t a crime, but when it comes to kitchen design, it really should be. Imagine how uninspiring it is to walk into a kitchen where everything is beige: pine cabinets, sandy coloured floor tiles, light brown worktops and beige wall tiles. If that’s your idea of tasteful, you really should consider asking someone else to design your kitchen. At the other end of the extreme, imagine the horror of red lacquered units, black marble worktops, and magenta walls. Once again, if you think that sounds cool you need taste-bypass surgery.

Don’t Opt for Poor Quality Kitchen Cabinets and Accessories

Not everyone has tens of thousands to spend on a new designer kitchen, but even if you are shopping on a budget, you should never opt for really low quality kitchen cabinets and cheap appliances because if they don’t fall apart during the installation, they almost certainly will before the end of the first year. However, if you are installing a new kitchen in a rented house, don’t be tempted to spend a fortune on good quality units unless you are hoping to attract executive tenants.

Don’t Go Too Mad on the Colour Chart

Kitchens are a great place to inject some colour, but you do need to rein in your creative urges to a degree, particularly if you are planning on selling up in the next couple of years. It is ok to paint the walls a bright colour as long as the kitchen cabinets are fairly neutral, but if you have chosen some super modern lacquered cabinets in a bright colour, don’t then paint the walls in a contrasting shade of paint. This is not to say you shouldn’t stamp your personality on the room, but there is such a thing as ‘too much’ personality.

Don’t Go Overboard on Cabinets

Sufficient storage space is a requisite for a well-designed kitchen as it removes miscellaneous clutter from worktops and helps you to maintain clean lines. However, as with most things in life you can have too much of a good thing and filling every available piece of space with cabinetry is not so great from a design perspective. It will make the room feel too overcrowded and cost a lot more in the process.

Don’t Skimp on Worktop Space

The Worktop is where the practical jobs happen. It’s difficult to carve a roast chicken on the hob and even more difficult to measure out the ingredients for a nice cake on the draining board, so make sure you have enough worktop space in the right areas or things could get a trifle messy.

Don’t Attempt a DIY Kitchen Unless You Know What You’re Doing

If you are a fan of daytime makeover shows, you will know exactly what a DIY kitchen disaster looks like when the person who installed it knew next to nothing about DIY. So if you don’t know one end of a screwdriver from another, pay a professional to do the job.

A smart, modern new kitchen can add value to a property, but only if it is a quality installation, so bear this in mind before you start the project.

How to Fix a Leaking Tap

Leaking taps are hardly an emergency, but if left to drip incessantly they can drive a person insane. A constantly dripping tap is also a tremendous waste of water, which if you are on a water meter, could prove to be rather expensive: a leaky tap can quite easily drip away up to 24,000 litres of water over a twelve month period. So why do people ignore leaky taps?

A DIY Fix

Most people put up with a leaking tap because they mistakenly think it is difficult to fix and if they have to call out a plumber, it will cost them a fortune. But really, sorting out a leaky tap is well within the capabilities of a competent DIY enthusiast and if you have the right tools to hand, there is no reason why you can’t fix the tap yourself.

Leaking Tap

The Right Tools for the Job

To fix a leaking tap you need a few basic tools:

  • A set of spanners
  • A screwdriver
  • Some clothes to protect the chrome tap fittings
  • Replacement tap washer

Fixing a Leaking Tap

Before doing anything, make sure you turn the water off at the mains stop tap. Do make sure the water is off before you remove the problem tap or you will end up soaked and standing in a foot of water, which won’t do either the kitchen or bathroom much good. To do this, turn the taps on and leave them to drain out until there is no more water in the pipes.

Remove the top of the tap and the screw beneath. This will enable you to take the tap head off. If the tap head is stuck, spray some WD-40 into it to loosen it up (you may need to leave it for ten minutes or so to work).

Remove the body of the tap using a spanner. Do this very carefully and protect the chrome surface with a soft cloth. The washer is the circular rubber donut at the end of the tap body. Replace it with a new washer and re-assemble the tap, making sure you don’t over tighten any of the parts.

Turn the water back on and test the tap (if no water comes out, make sure you have closed off all the other taps). Does it still leak? If so, the washer was not the underlying issue and you need to go back to the drawing board and start again.

When the Washer isn’t the Problem

More often than not, a worn out washer is not the cause of a leaking tap. A more likely root cause is the valve seat upon which the washer sits. Over time, this becomes worn, often as a result of lime scale in hard water. The surface develops fine grooves and etched lines, which break the seal of the washer and allow water to seep through. Grinding down this surface with a purpose made seat grinder will solve the problem by creating a smooth surface for the tap washer to adhere to.

Help! I Can’t Fix My Tap!

In theory it should take no more than 20 minutes to fix a leaking tap, but if the mechanism is worn or you have tried all of the above and you still have a leak, then it is probably time to call on a plumber to do the job for you. Most plumbers will charge for one hour’s work, even if the job takes them less than five minutes, including a cup of tea and a chat. If you want to pay as little as possible, try and be flexible about when the plumber can visit – if he is able to call in on his way home, for example, he might charge you less. Or wait for a few weeks and call him to install your new stainless steel towel radiator and replace your tap at the same time.

Don’t forget to get a couple of quotes before engaging a plumber and ideally go with someone you know or who comes with good references. 

Super Storage Ideas for Teeny Tiny Bathrooms

Unless you are lucky enough to live in a Bel Air mansion, it is highly likely that your bathroom is a bit on the ‘compact’ size. Sad to say, most UK bathrooms are pretty small. Older properties built before indoor bathrooms were standard often have small bathrooms tacked on to the back of the house or constructed in a partition of a large bedroom. Modern homes are not much better. Here space is at a premium and the family bathroom is squeezed in between two or three equally small bedrooms. So if you, like most people, have to make do with a tiny bathroom, what are your storage options?

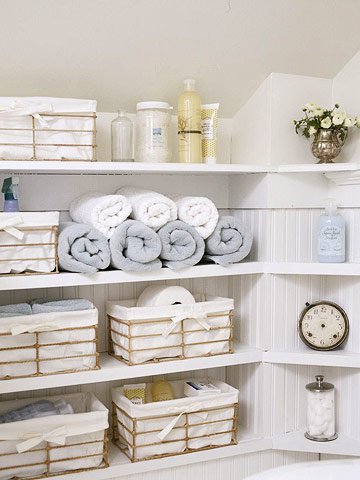
Built in Shelves

Built in shelves are perfect for irregular shaped bathrooms. Sometimes, thanks to poor planning, you end up with a gap between the end of the bath and the wall. Or you could have a small space next to the sink that is begging to be filled with something. Either way some shelves would be useful for storing toiletries or towels. Just remember that if you build them from scratch, the wood will need to be treated in order to protect it from the humidity.

The more shelves in a small bathroom you have the better. They are useful for storing toiletries and medication. You don’t even need to leave items on full view – simply buy some small storage containers and place them on your shelves. You could also build shelves above a towel radiator if it is not a full height one.

Multi Functional Storage

Simple shelving units can be used in a variety of different ways in a bathroom. In general, when space is at a premium, look for tall, thin units that will slot easily in between a bath and sink, or shower and sink. Shelves can be used for storing towels and larger items. Place baskets on lower shelves for toiletries and personal items you don’t want lying around in full view of your guests. If you place a shelf next to the bath or shower, fix a towel rail to the side of it and you instantly have a dual-purpose piece of bathroom furniture. Laundry baskets can be used as shelves. Buy a wooden laundry basket and stack towels on the top.


Built in Shelves

Bath Caddies

Bath Caddies

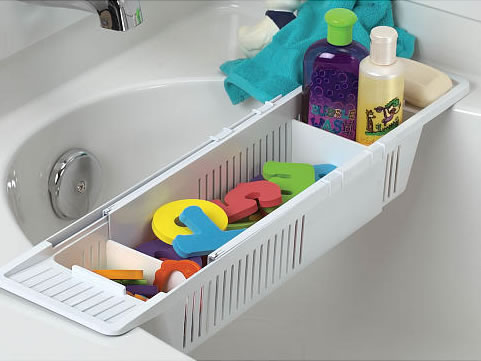
Bath caddies sit over the bath. They are a bit old-fashioned – your grandma probably had one a few decades ago – but if you purchase a stylish bath caddy it will be a useful investment. You can use a bath caddy to store bath toys for the kids, shampoo, soap and conditioner. Children like bath caddies because they can play with them at bath time, but you can use it to prop up a book for those moments when you are able to lock the door and enjoy a nice relaxing soak.

Sink Storage Units

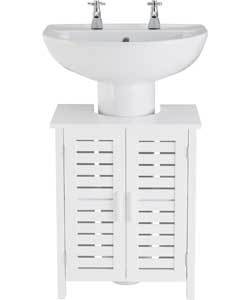
There are lots of sink storage units to choose from. In-built units are a good option if you are in the process of redesigning your bathroom. These offer extra storage beneath a sink unit and remove the need for a pedestal. If you already have a bathroom and you don’t wish to change the configuration, look at storage units that fit around an existing sink. Use them for storing cleaning products or toiletries.

When it comes to small bathroom storage, be creative. It is easy to source useful storage furniture on the cheap if money is in short supply; or you could build your own from discarded wood. Make use of all your small nooks and crannies and instead of struggling to find room for your favourite bath soaps and scented candles, you can enjoy a small, but perfectly formed, bathroom.

Sink Storage Units
Hard or Soft - Know Your Drain Blockages!

Blocked drains of any description can be a total nightmare. Nobody likes standing in a foot of soapy water every time they have a shower and a blocked toilet is deeply unpleasant, particularly if it’s the only one available and you all ate curry last night. Blockages are one of the commonest plumbing problems. They affect most home and business owners at one time or another, but what not many people realise is that there are two types of blockage: hard and soft. So what is the difference and how should you deal with each type of blockage?

Do I Have a Blocked Drain?

Drain problems often develop slowly. In the beginning when all is right with the world and your drains, water disappears instantly down the plughole and you don’t give the matter a second thought. After a while, though, you have standing water in the sink, shower or bath and curious ‘glugging’ noises are emanating from the plughole as the water slowly drains away. In the case of toilets, you might find that it doesn’t always flush properly and you have to flush several times before the contents of the bowl disappear.

What Causes Blockages?

There are many reasons why drains become blocked and not all of them are within your sphere of control. In answering the question of what causes blockages, I will also address the difference between soft and hard drain blockages.

Soft Drain Blockages

Soft blockages are the most common type of material clogging up drains. Hair mixed with soap scum is a very effective material for gluing up bathroom drains. In the case of toilets, excessive amounts of toilet paper, sanitary towels and even disposable nappies can do a great job of causing a pile-up in the U-bend. In the kitchen, blocked drains are usually caused by a build-up of cooking fat and food residue: deeply unpleasant and difficult to shift if it has been allowed to accumulate over a long period of time.

Clearing Soft Blockages

For minor blockages, your best bet is to try a drain cleaner from your local supermarket. They are usually effective when the blockage is relatively near the sink drain. However, if a lot of material has built up and the blockage extends deep down into the pipe system, you will require professional assistance in the form of a plumber and a plumbing snake. Toilet blockages can often be cleared with the aid of a large plunger. Alternatively, strap some rubber gloves on and go on an exploratory mission down the u-bend. It won’t be pretty, but it could save you time and money. If this doesn’t work, call a plumber.

Hard Drain Blockages

A hard blockage is more serious and expensive to fix. In this instance you are dealing with objects blocking the drain, usually outside. Tree roots are a good example of a hard drain blockage. Over time tree root systems can infiltrate external drains and sewer pipes causing all kinds of mayhem. Mineral build-ups are another example of a hard blockage, although this is more common in hard water areas and doesn’t happen overnight.

Clearing Hard Blockages

A bottle of drain cleaner is not going to get rid of a tree root in your drainpipe. In fact not even a plumber with his trusty sink plunger and plumbing snake is going to have much luck clearing a hard blockage. You may also need to hire a specialist drain camera inspection company to work out exactly where the blockage is.

For blocked drains, leaky towel radiators and any other plumbing emergencies, use your common sense: if you don’t have the skills or tools to fix the job, call in a plumber!